Struggling with Wi-Fi Issues? We Fix Them Fast!
Whether you’re dealing with weak signals, slow internet speeds, or unstable connections, our skilled experts are here to help. We quickly diagnose and resolve all types of Wi-Fi problems to ensure smooth, reliable, and uninterrupted internet performance.
How to Set Up a WiFi Router
Configuring Wired and Wireless Connections
Setting up both wired and wireless connections on a WiFi router is important for building a reliable home network. Most WiFi routers come with easy-to-use interfaces that make the setup process simple. Follow these step-by-step instructions to successfully configure both types of connections.
Before you start:
- Make sure you have your WiFi router, power adapter, and an Ethernet cable available.
- Keep your Internet Service Provider (ISP) details ready, such as your username and password, if they are required.

Setting Up a Wired Connection
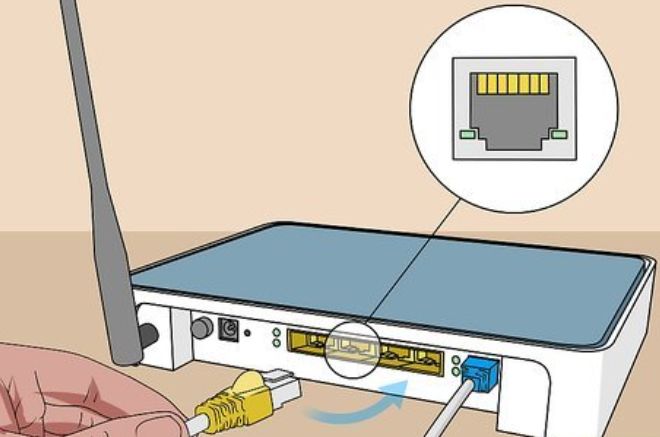
Connect the Hardware:
- Power the WiFi router by plugging it into an electrical outlet using the supplied power adapter.
- Connect the modem to the router’s WAN (Internet) port with an Ethernet cable.
- Use another Ethernet cable to link your computer to any LAN port on the router.
- Turn On the Router: Switch on the WiFi router using the power button, if it has one. Allow a few minutes for the router to start up completely.
Access the Router’s Web Interface:
- On the connected computer, open any web browser.
- Type the router’s default IP address in the address bar, commonly http://192.168.1.1 or http://192.168.0.1, then press Enter.
- When prompted, log in using the default username and password (usually both are “admin”). These details are typically printed on the router label or mentioned in the user manual.
Configure Internet Settings:
- After logging in, go to the WAN (Internet) configuration section.
- Choose the connection type according to your ISP (such as DHCP or PPPoE).
- Enter the required information provided by your ISP, including username and password.
- Save the configuration.
- Test the Wired Connection: Open a web browser and visit any website to confirm that the wired internet connection is working properly.
Setting Up a Wireless Connection
Initial Setup:
Access the Router’s Web Interface (if you are not already logged in):
- Open any web browser.
- Enter the router’s IP address in the address bar, commonly http://192.168.1.1 or http://192.168.0.1.
- Log in using the administrator username and password of the router.
Configure Wireless Settings:
- Go to the wireless configuration section within the router’s web interface.
- Assign a unique name to your Wi-Fi network (SSID).
- Set a strong password for your Wi-Fi network (WPA2 security is recommended).
- Choose the correct wireless security mode and encryption options.
Save and Apply the Settings: After completing the wireless configuration, save and apply the changes. The router may take a short time to update the settings.
Connect to the Wi-Fi Network:
- On your wireless device (such as a laptop or smartphone), scan for available Wi-Fi networks.
- Find and select the SSID of your WiFi router.
- Enter the Wi-Fi password that you configured earlier.
Test the Wireless Connection: Once connected, open a web browser on the wireless device and check whether websites are loading correctly.
You have now successfully configured both wired and wireless connections on your WiFi router. Multiple devices can connect to the network wirelessly using the SSID and password you have set.
1. Introduction
A router is a device that enables multiple computers, smartphones, and other devices to connect to a single network. The router is usually linked to a modem so that all connected devices can access the Internet. This guide is designed to assist you with the initial setup of your router, especially if you are configuring it for the first time.
Inside the box, you may find some of the following items:
- Power adapter or charger for the router
- User or device manual
- Driver disc (available with certain models)
- USB cable (included with some models)
- Network (Ethernet) cable (included with some models)
2. Connect Power
Make sure you are using the power adapter that was provided with your router.
- Find the power cable and plug it into a power source, such as a wall outlet or a surge protector.
- Insert the other end of the power cable into the router’s power port, which is usually located at the back of the device.
- The router should now turn on automatically.
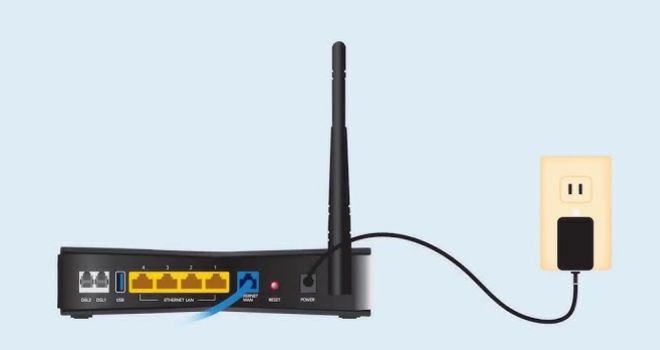
3. Connect to Modem Using a Cable/Wire
To provide internet access to your local network, the router must be connected to a modem.
- First, get an Ethernet cable.
- Insert one end of the cable into the Internet (WAN) port located on the back of the router. This port is often blue or grey in color.
- Connect the other end of the cable to an available Ethernet (LAN) port on the back of the modem. These ports are usually yellow.
In most cases, this setup is sufficient to establish a wired connection between the router and the modem.
4. WiFi
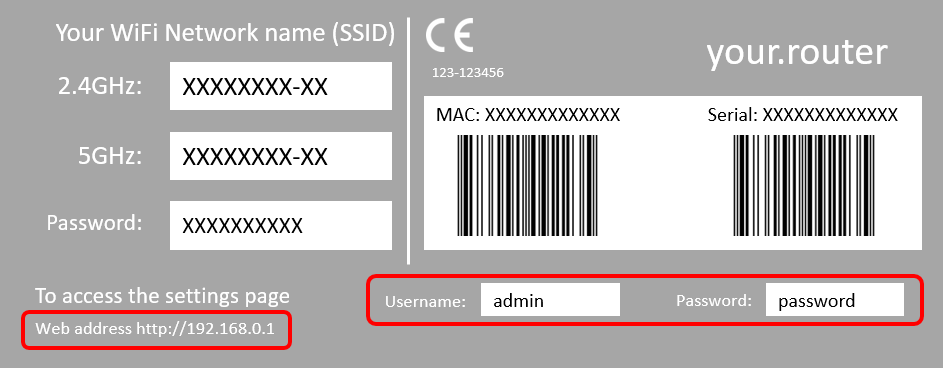
A label on the bottom of the router displays the default login website and access details.
- Using a computer that is connected to the WiFi router, open any web browser, such as Safari, Google Chrome, or Internet Explorer.
- In the address bar, go to http://www.routerlogin.net.
If this address does not open, try one of the following alternatives:
- http://www.routerlogin.com
- http://192.168.1.1
- http://192.168.0.1
- When prompted, enter the router’s username and password. The default login details are usually:
- Username: admin
- Password: password
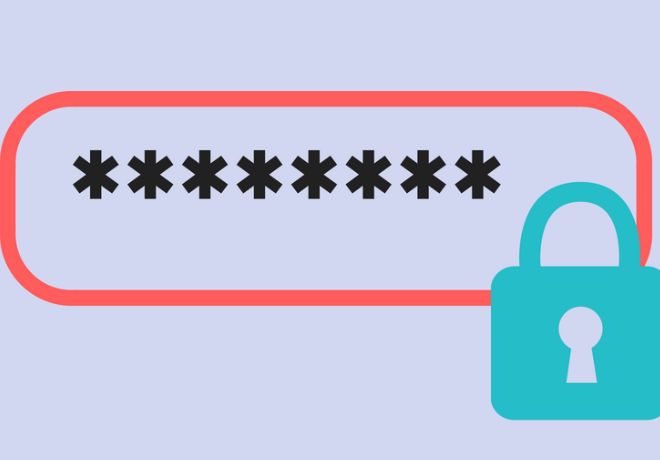
5. Select a Password
Whenever possible, choose a password that is very difficult to guess and resistant to brute-force attacks. Keep in mind that some devices or systems may have restrictions on special characters or other specific requirements.
Best practices for creating a strong password:
- Use a password that is around 8 to 12 characters long, though longer passwords are even better.
- Avoid using dictionary words.
- Do not use easily guessable information, such as:
- Important dates like birthdays or anniversaries
- Names of pets, friends, family, or locations
- Increase the complexity of your password by including at least:
- 1 uppercase letter
- 1 lowercase letter
- 1 number
- 1 symbol
- 1 number
Tip: Replace letters with symbols to make your password harder to guess. For example:
- "Abc?123!" is easier to guess than "@B(?123!"
- "Password!?" is easier to guess than "P@$$w0rd!?"
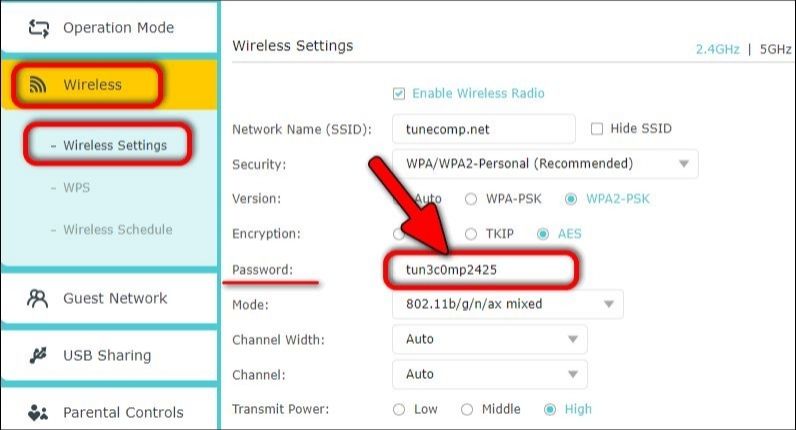
6. Change Network Password
- Open the Wireless section. On older routers, this option may be labeled Wireless Settings.
- If you want, you can also change your network name (SSID) at this stage. The SSID is the name that appears when searching for available Wi-Fi networks nearby.
- Under Security Options, choose WPA2-PSK [AES].
- Enter your selected password in the Password field.
- Make sure to note down your network name (SSID) and password, as you will need them to connect your devices to the Wi-Fi network.
- Click Apply to save the updated settings.
Your wireless security settings are now successfully updated.
- Whenever you change wireless security settings, all wireless devices must be reconnected.
- If your router supports dual-band networks (2.4 GHz and 5 GHz), you may need to repeat these steps for each band, as they are managed separately. Each band should have a different network name.
- If your router includes a guest network, repeat the same steps for the guest network, since it is configured independently.

7. Keeping Your Password Secure
To protect your password, it is important to follow certain security precautions.
Best practices include:
- Avoid using a single master password for all purposes, such as email, work, school, home, or network access.
- Do not share your password with anyone unless it is absolutely necessary.
- If a password must be shared, such as for a home network, limit sharing to only those who truly need access.
- Be cautious when entering your password in public places and ensure that no one can see you typing it.
- Remember that some devices, including computers and smartphones, can store passwords, so avoid saving passwords on devices that do not belong to you.
- Set a routine for changing your password, for example, once every 180 days.
- Writing down passwords is not recommended; however, if you must do so, keep them in a place that is not physically or visually accessible to others.
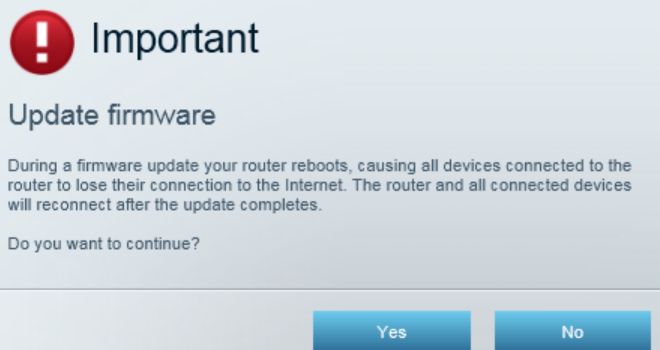
8. Deciding to Update
Router updates are released to improve security by adding new protection features, fixing known vulnerabilities, and sometimes enhancing performance. To ensure the highest level of security, it is recommended to update your router at this stage.
Depending on the router model, updating may require an active internet connection, a computer, and possibly a formatted USB flash drive.
You can choose to perform the update now or postpone it for a later time.
9. Updating Your WiFi Router